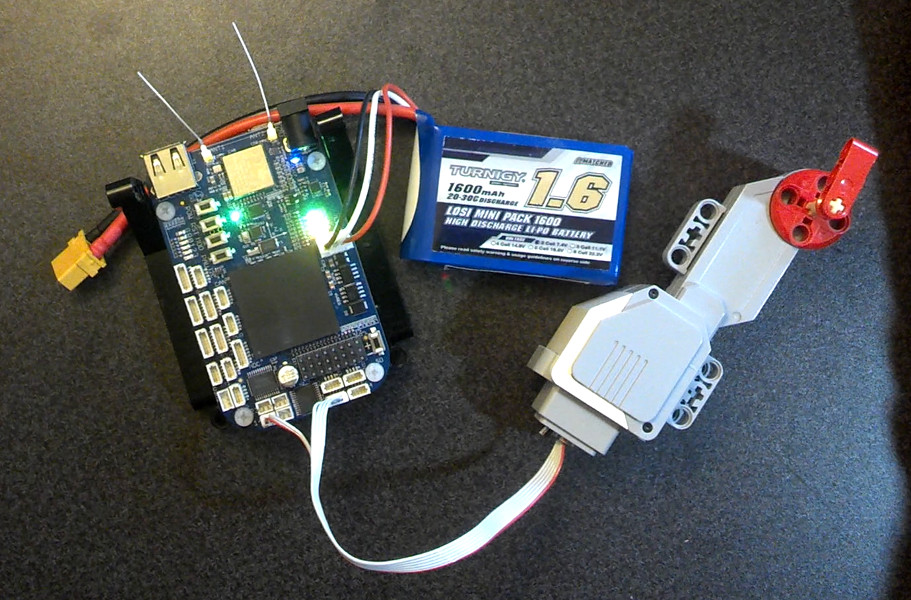
Using LEGO MINDSTORMS Motors with BeagleBone Blue
It turns out that it is possible to connect Mindstorms EV3 motors directly to the BeagleBone Blue. So really, this is just a matter of creating an adapter cable. First, let’s talk about the LEGO Mindstorms motor connections.
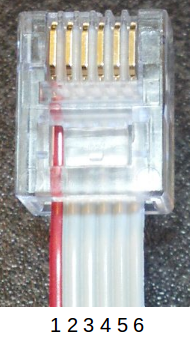
The NXT and EV3 motors both have the same connector. It is an RJ12 style, 6 position, 6 pin connector. But, it has a very important difference! The latch is offset rather than being centered. Furthermore, there is a similar connector with an offset latch called a “DEC” RJ12 connector, but the latch is offset in the opposite direction. This means you will either need to sacrifice one of your cables that came with your Mindstorms kit, or you can purchase compatible connectors and cables from mindsensors.com and their global distributors (as far as I know they are the only source for such connectors). Or, you can hack your own like Philo.
When connected to a LEGO motor, these cables have the following pinout:
| Pin | Description |
| 1 | motor – |
| 2 | motor + |
| 3 | GND |
| 4 | 5V |
| 5 | quadrature encoder A |
| 6 | quadrature encoder B |
The BeagleBone Blue provides connections for motors and quadrature encoders, but it is split up into two connectors – one for motor power (M1) and one for the quadrature encoder (E1).
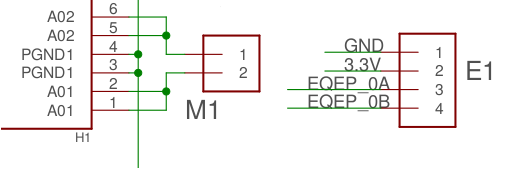
You may have noticed that the BeagleBone has 3.3V but LEGO uses 5V. This voltage powers the electronics for the quadrature encoder. I have checked the LEGO EV3 motor schematics (large and medium motors) and they are 3.3V compatible, so no problem there. Unfortunately, the NXT motors have different internal electronics that don’t work with 3.3V. Although it is perfectly safe to connect an NXT motor, the Blue can’t detect the quadrature encoder signals. You will need additional electronics, like a 74HC2G14, in order to use NXT motors (EV3 motors and the EV3 brick have these built-in).
To get the same positive rotation direction as the official Mindstorms software, this is what I came up with:
| LEGO Motor Pin | LEGO Cable Wire Color* | BeagleBone Blue Connector/Pin | Description |
| 1 | white | M1/2 | Motor – |
| 2 | black | M1/1 | Motor + |
| 3 | red | E1/1 | GND |
| 4 | green | E1/2 | 3.3V |
| 5 | yellow | E1/3 | quadrature encoder A |
| 6 | blue | E1/4 | quadrature encoder B |
* I can’t promise that all LEGO cables use the same color scheme, but this seems to be fairly universal.
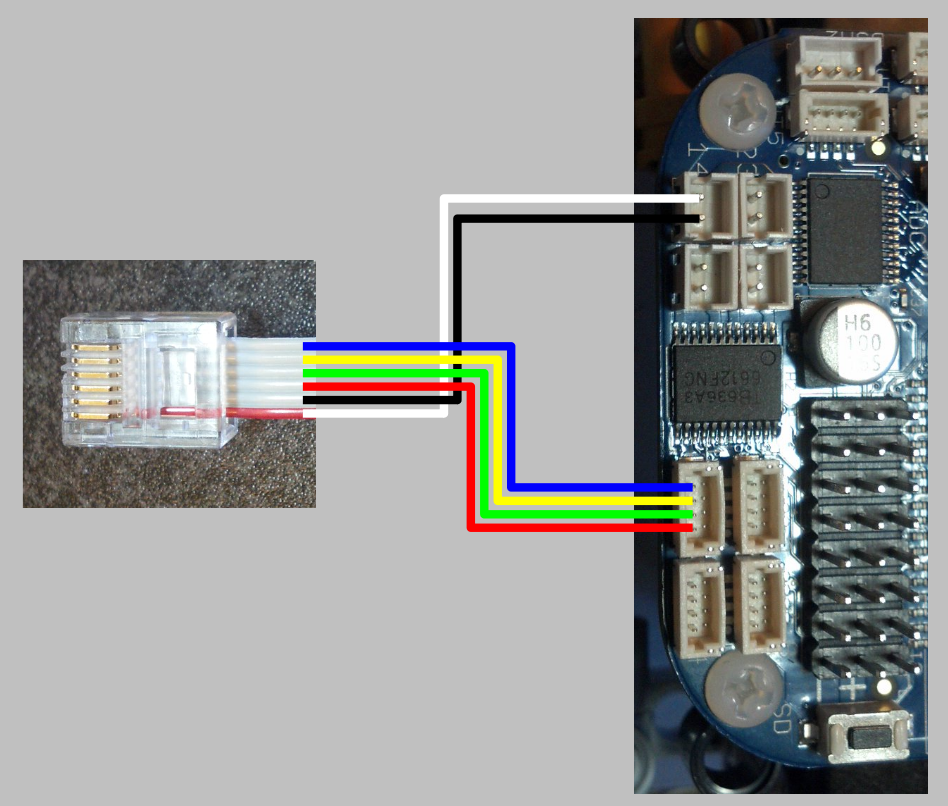
It works out really nicely since the connections are in the same order on both sides of the cable. I opted to make my own cables by crimping connectors onto some cables I bought from mindsensors.com. It makes for a very nice looking cable, but I don’t recommend that you try this at home unless you have extraordinary patience. Working with such tiny connectors by hand is extremely challenging, but apparently it is possible.

So, if you want to be like me and do it the hard way, here are the parts I used:
- HobbyKing crimp tool
- JST-SH 4-pin female plug and pins
- JST-ZH 2-pin female plug
- JST-ZH pins
- Ribbon cable with Mindstorms connector
Be sure to buy lots of extras for when you mess up. However, I think it would be much easier to buy a pre-wired JST-SH pigtail and a JST-ZH pigtail instead and splice them with the ribbon cable above.
Once you have created a cable, you can test out the motor using the rc_test_motors and rc_test_encoders commands on the BeagleBone Blue. If you did it right, it should work as is shown in this short video.
This is going to be awesome…
And now for the bonus round. Mindsensors.com also sells servo motors with LEGO-compatible mounting kits. You can connect these directly to the servo ports on the BeagleBone Blue for even more LEGO action. Test it with the rc_test_servos command.
I happened to already have one…
This is part 2 of a series about using LEGO Mindstorms with BeagleBone Blue. In part 1 you can learn how to mount your BeagleBone to a LEGO chassis. Hopefully there will be a part 3 soon(ish) where I will explain how to use LEGO Mindstorms sensors with the BeagleBone Blue.
Thank you! I found this article yesterday and it might help me with using the Pololu brand, “Romi Encoder Pair Kit #3542” with my Beaglebone Blue. Since this encoder operates from 3.5v to 18v and the encoder connection on the Blue is 3.3v I suspect I’ll need a level shifter. Renaissance Robotics makes a JST jumper bundle that should make it easier to to connect wiring from the Pololu encoder to the Blue’s encoder connection, as well.
hello, can be possible use a sensor ultrasonic HC-sr04 like use an arduino on the lego nxt??