Overclocking LEGO MINDSTORMS EV3
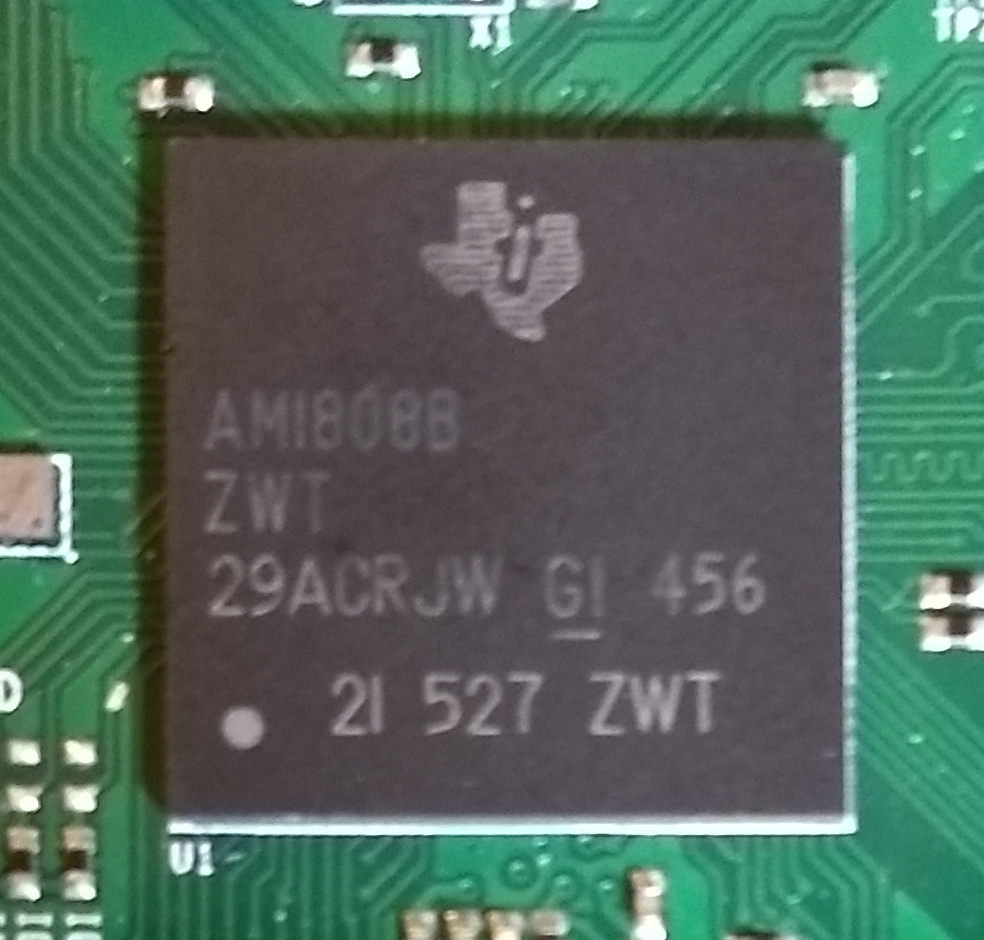
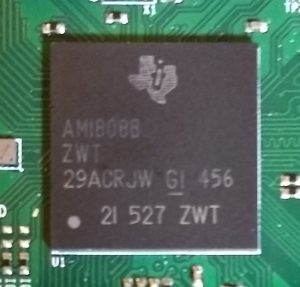
So, I discovered something quite interesting recently. LEGO MINDSTORMS EV3 doesn’t actually have a 300MHz processor like it says in the specs. I actually has a 456MHz processor running at 300MHz. Don’t believe me? It is printed right on the chip…
Whoa! We need to take advantage of this right? But we don’t want to damage it, so we better have a look at the docs first. As you may have guessed already, we can probably run this faster than 300MHz without actually “overclocking” anything, but rather run completely within spec of the processor.
Research
Let’s look at the AM1808 datasheet. It looks like we have a AM1808BZWT4 (also confirmed on the schematic below).
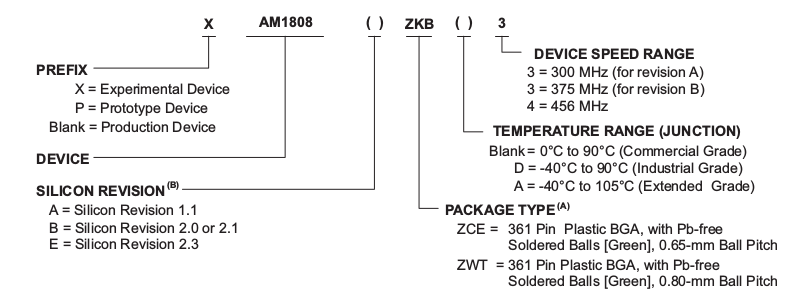 The 456 is 456MHz, looking good so far. Now, here are some other interesting tidbits.
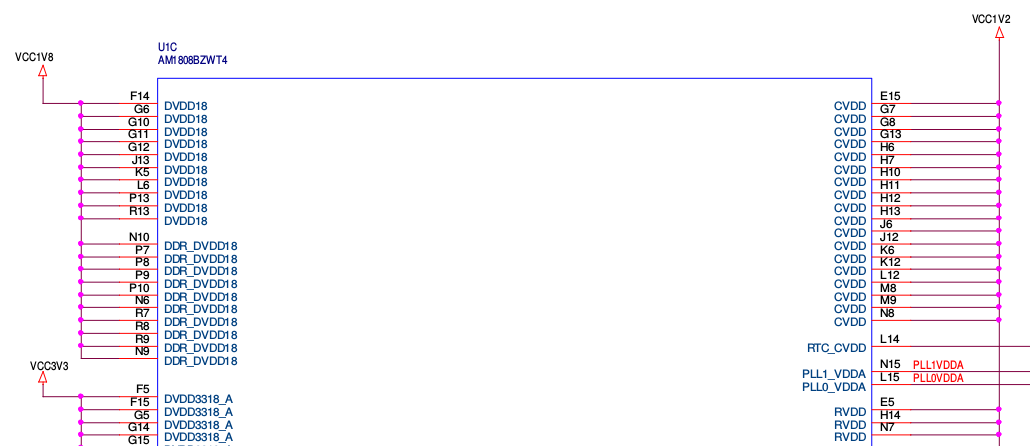
So, it looks like if we want to run at 456MHz, we are going to need 1.3V on CVDD and RVDD. Let’s have a look at the EV3 schematic an see what we have for a power supply.
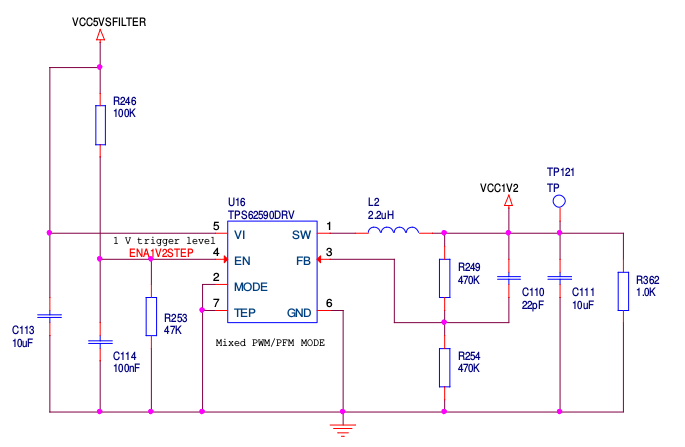 Drat! There is a fixed power supply at 1.2V. We aren’t going to get that 1.3V we need for running at 456MHz. But, we can still do 375MHz and still be within spec. This is still better than 300MHz, so let’s keep going. Now, we are going to have to dig deeper in the Technical Reference Manual to see how to actually control the clock speed.
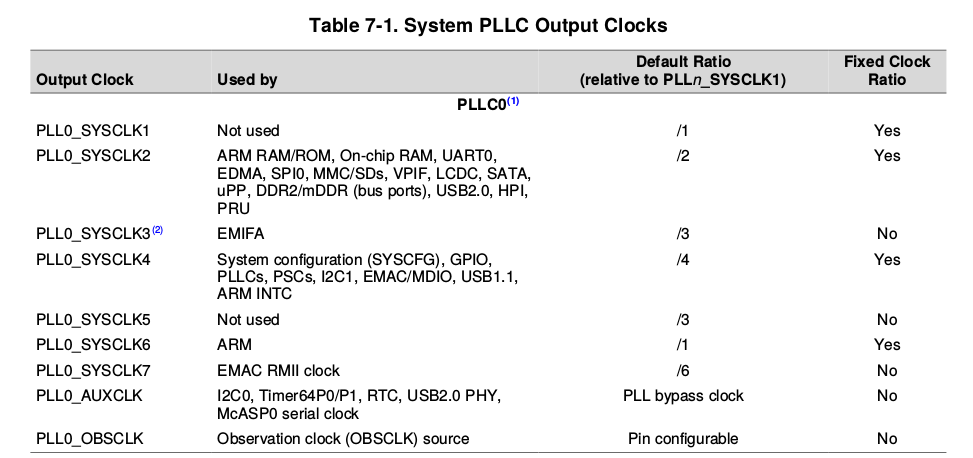
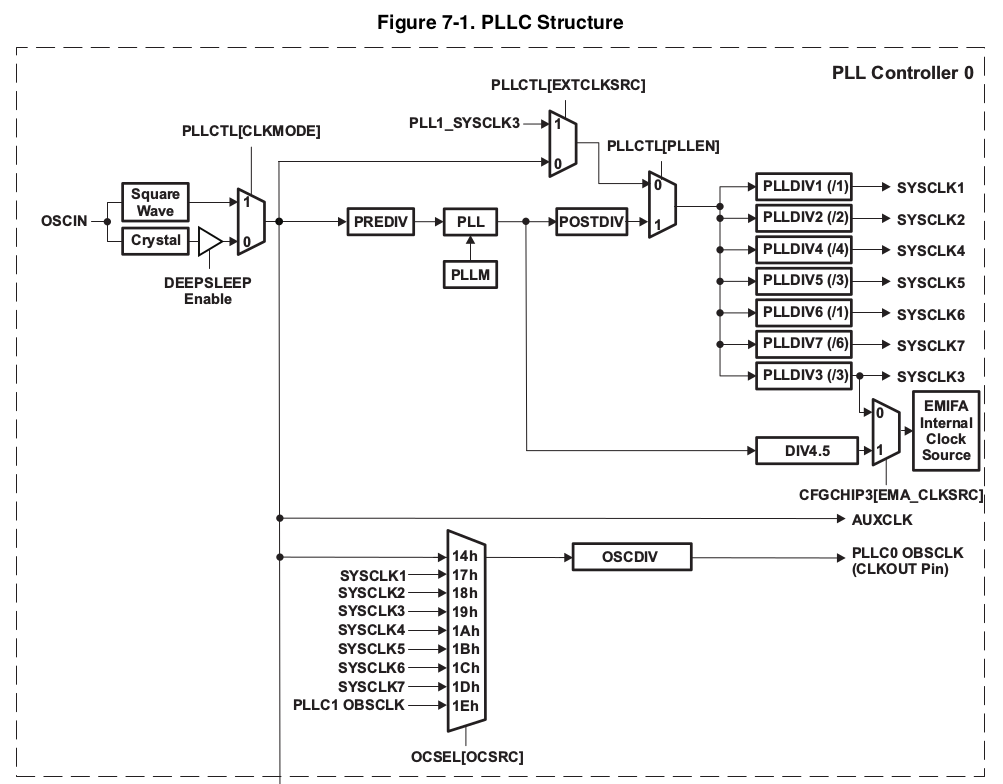
The ARM core is clocked by PLL0_SYSCLK6. So, to change the speed, we need to adjust PLL0. This will have the effect of changing bunch of other clocks too. Half of these are not used on the EV3. Most of the rest are integral to the SoC, so we don’t have to worry about it. The PRU (Programmable Runtime Unit) is probably going to be problematic. The UARTs for input ports 3 and 4 on the EV3 are implemented using the PRU, so the baud rates are probably going to get messed up. It is unfortunate, but not a deal-breaker. And then, there is the DDR2 (bus port). This is external to the SoC and drives the RAM chip. So we better check the RAM specs.
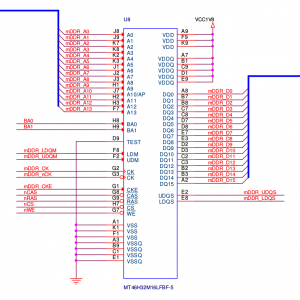 It looks like we have a MT46H32M16LFBF-5 chip. So having a look at the datasheet…
 So, we have the 200MHz version. Very cool. Now, it’s time for some math.
The clock is controlled by adjusting a PLL (Phase Locked Loop). The EV3 normally has PREDIV=1, PLLM=25 and POSTDIV=2. It has a 24MHz oscillator, so we get 24 / 1 * 25 / 2 = 300MHz. This is divided by 1 in PLLDIV6, so the ARM core runs at 300MHz. The DDR is fed by SYSCLK2, so it is divided by 2, running at 100MHz. The way the math works out, we can’t actually get 375MHz. The closest we can get is 372MHz (PREDIV=1, PLLM=31 and POSTDIV=2, so 24 / 1 * 31 / 2 = 372MHz). Close enough. This mean the DDR will be running at 186MHz. That’s less than 200MHz, so yay.
Implementation
There is a read-only I2C boot EEPROM in the EV3 that takes care of setting up the processor very early in the boot process. Since it is read-only, we can’t touch this. However, we can mess with the U-Boot bootloader that resides in the 16MB flash memory and we can also use the clock framework in Linux to adjust things.
There is some frequency scaling code in the Linux kernel for the EV3, but I’m not sure it is working, so we’ll focus on U-Boot for now. There is some code for adjusting the PLL, but it is not enabled for the EV3. If we just copy it to the EV3 file and tweak a few numbers, U-Boot readjust the clocks for us before Linux starts.
diff --git a/board/lego/ev3/legoev3.c b/board/lego/ev3/legoev3.c
index cbd579a..73363b99 100644
--- a/board/lego/ev3/legoev3.c
+++ b/board/lego/ev3/legoev3.c
@@ -24,6 +24,8 @@
 #include <hwconfig.h>
 #include <asm/mach-types.h>
 #include <asm/setup.h>
+#include <mach/da850_lowlevel.h>
+#include <mach/pll_defs.h>

 #ifdef CONFIG_MMC_DAVINCI
 #include <mmc.h>
@@ -58,6 +60,114 @@ const struct pinmux_resource pinmuxes[] = {

 const int pinmuxes_size = ARRAY_SIZE(pinmuxes);

+/*
+ * PLL configuration
+ */
+#define CONFIG_SYS_DV_CLKMODE 0
+#define CONFIG_SYS_DA850_PLL0_POSTDIV 1
+
+static void da850_waitloop(unsigned long loopcnt)
+{
+ unsigned long i;
+
+ for (i = 0; i < loopcnt; i++)
+ asm(" NOP");
+}
+
+static int da850_pll_init(unsigned long pllmult)
+{
+ /* Unlock PLL registers. */
+ clrbits_le32(&davinci_syscfg_regs->cfgchip0, PLL_MASTER_LOCK);
+
+ /*
+ * Set PLLENSRC '0',bit 5, PLL Enable(PLLEN) selection is controlled
+ * through MMR
+ */
+ clrbits_le32(&davinci_pllc0_regs->pllctl, PLLCTL_PLLENSRC);
+ /* PLLCTL.EXTCLKSRC bit 9 should be left at 0 for Freon */
+ clrbits_le32(&davinci_pllc0_regs->pllctl, PLLCTL_EXTCLKSRC);
+
+ /* Set PLLEN=0 => PLL BYPASS MODE */
+ clrbits_le32(&davinci_pllc0_regs->pllctl, PLLCTL_PLLEN);
+
+ da850_waitloop(150);
+
+ /*
+ * Select the Clock Mode bit 8 as External Clock or On Chip
+ * Oscilator
+ */
+ dv_maskbits(&davinci_pllc0_regs->pllctl, ~PLLCTL_RES_9);
+ setbits_le32(&davinci_pllc0_regs->pllctl,
+ (CONFIG_SYS_DV_CLKMODE << PLLCTL_CLOCK_MODE_SHIFT));
+
+ /* Clear PLLRST bit to reset the PLL */
+ clrbits_le32(&davinci_pllc0_regs->pllctl, PLLCTL_PLLRST);
+
+ /* Disable the PLL output */
+ setbits_le32(&davinci_pllc0_regs->pllctl, PLLCTL_PLLDIS);
+
+ /* PLL initialization sequence */
+ /*
+ * Power up the PLL- PWRDN bit set to 0 to bring the PLL out of
+ * power down bit
+ */
+ clrbits_le32(&davinci_pllc0_regs->pllctl, PLLCTL_PLLPWRDN);
+
+ /* Enable the PLL from Disable Mode PLLDIS bit to 0 */
+ clrbits_le32(&davinci_pllc0_regs->pllctl, PLLCTL_PLLDIS);
+
+ /* Program the required multiplier value in PLLM */
+ writel(pllmult, &davinci_pllc0_regs->pllm);
+
+ /* program the postdiv */
+ writel((PLL_POSTDEN | CONFIG_SYS_DA850_PLL0_POSTDIV),
+ &davinci_pllc0_regs->postdiv);
+
+ /*
+ * Check for the GOSTAT bit in PLLSTAT to clear to 0 to indicate that
+ * no GO operation is currently in progress
+ */
+ while ((readl(&davinci_pllc0_regs->pllstat) & PLLCMD_GOSTAT) == PLLCMD_GOSTAT)
+ continue;
+
+ /*
+ * Set the GOSET bit in PLLCMD to 1 to initiate a new divider
+ * transition.
+ */
+ setbits_le32(&davinci_pllc0_regs->pllcmd, PLLCMD_GOSTAT);
+
+ /*
+ * Wait for the GOSTAT bit in PLLSTAT to clear to 0
+ * (completion of phase alignment).
+ */
+ while ((readl(&davinci_pllc0_regs->pllstat) & PLLCMD_GOSTAT) == PLLCMD_GOSTAT)
+ continue;
+
+ /* Wait for PLL to reset properly. See PLL spec for PLL reset time */
+ da850_waitloop(200);
+
+ /* Set the PLLRST bit in PLLCTL to 1 to bring the PLL out of reset */
+ setbits_le32(&davinci_pllc0_regs->pllctl, PLLCTL_PLLRST);
+
+ /* Wait for PLL to lock. See PLL spec for PLL lock time */
+ da850_waitloop(2400);
+
+ /*
+ * Set the PLLEN bit in PLLCTL to 1 to remove the PLL from bypass
+ * mode
+ */
+ setbits_le32(&davinci_pllc0_regs->pllctl, PLLCTL_PLLEN);
+
+ /*
+ * clear EMIFA and EMIFB clock source settings, let them
+ * run off SYSCLK
+ */
+ dv_maskbits(&davinci_syscfg_regs->cfgchip3,
+ ~(PLL_SCSCFG3_DIV45PENA | PLL_SCSCFG3_EMA_CLKSRC));
+
+ return 0;
+}
+
 const struct lpsc_resource lpsc[] = {
 { DAVINCI_LPSC_SPI0 }, /* Serial Flash */
 { DAVINCI_LPSC_UART1 }, /* console */
@@ -68,6 +178,8 @@ const int lpsc_size = ARRAY_SIZE(lpsc);

 int board_early_init_f(void)
 {
+ da850_pll_init(30);
+
 /* enable the console UART */
 writel((DAVINCI_UART_PWREMU_MGMT_FREE | DAVINCI_UART_PWREMU_MGMT_URRST |
 DAVINCI_UART_PWREMU_MGMT_UTRST),
You may have noticed that we are using 30 for the multiplier instead of 31. This is because the chip adds 1 to the value internally. We can flash the resulting u-boot.bin file using the official EV3-G software. You will have to run an OS like ev3dev from the SD card because the rest of the flash will be wiped out (don’t worry, you can always flash the official firmware back again).
Execution
So, are you feeling brave enough to try it out? There is a nice little download button below that has a modified u-boot.bin file. I’ve been using it for a couple days now with no issues. So far, I have noticed that it shaves some seconds off of the boot time and it only increases the current consumption by about 5mA. I don’t have anything to measure the temperature difference of the CPU, but it is not hot to the touch. I actually accidentally ran it at 384MHz for a few days without a problem (remember that extra 1 the PLLM register adds? Oops.).
As I already mentioned, you can just flash u-boot.bin to the EV3 using the EV3-G software and run ev3dev at a whopping 372MHz. To go back to the normal clock speed, just flash the official firmware (hold down the right button when booting to enter firmware update mode). You can confirm that CPU is running faster by running lscpu. It should say about 184 BogoMips instead of ~140. What will you do with the extra 24% speed increase?


Hi! Such a wondefull news 🙂 Is it possible to modify original EV3 software to make it work not only for EV3DEV?
I’m sure it is, but it will take some work and I am not sure that you would notice much of a difference.
Ok, thank you! Will try EV3DEV first 🙂
Unfortunately, flashing EV3 with u-boot.bin didn’t work for me – brick freezes onto “Starting…” screen.
You have to have ev3dev installed on a microSD card in the EV3.
I did and it was working fine on stock firmware! Your file has been flashed successfully, but nothing worked. No problem flashing it back anyway.
ev3dev-jessie or ev3dev-stretch?
ev3dev-jessie
It will probably work with ev3dev-stretch. I may have removed something from U-Boot needed to make ev3dev-jessie start.
Ok, i see. Will wait 🙂
Hi there!
Any news on making the overclocking work for the stretch kernel?
As far as I know, this should work with ev3dev-stretch. I haven’t touched it in a while.